Learning how to make homemade jewelry is easy when you have access to Leather Cord![]() , some pliers, and some ornamental items like pearls and beads. If you want to be truly fashionable this year, all you really need to learn to get started are the various knots used for jewelry making.
, some pliers, and some ornamental items like pearls and beads. If you want to be truly fashionable this year, all you really need to learn to get started are the various knots used for jewelry making.
Table of Contents
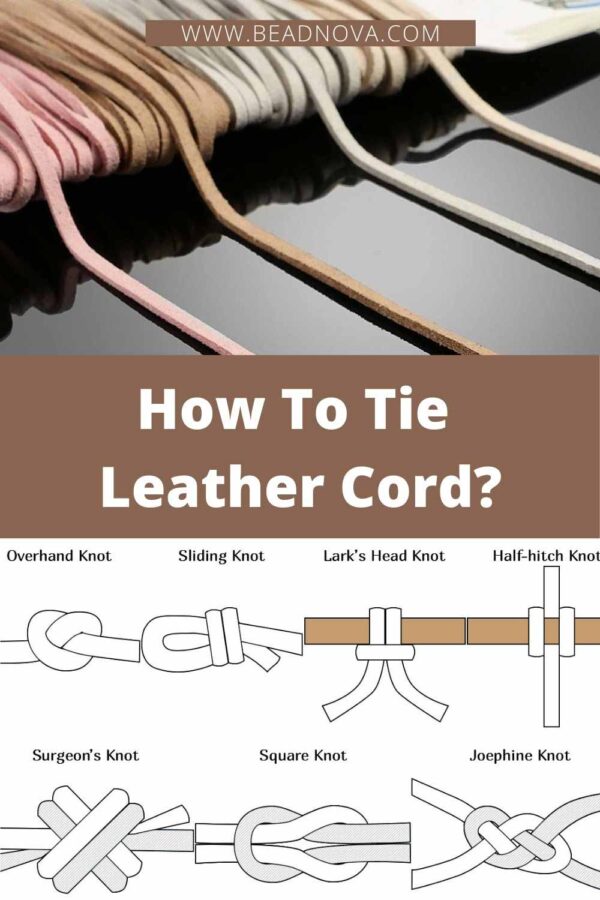
Jewelry Knots for Leather Cord
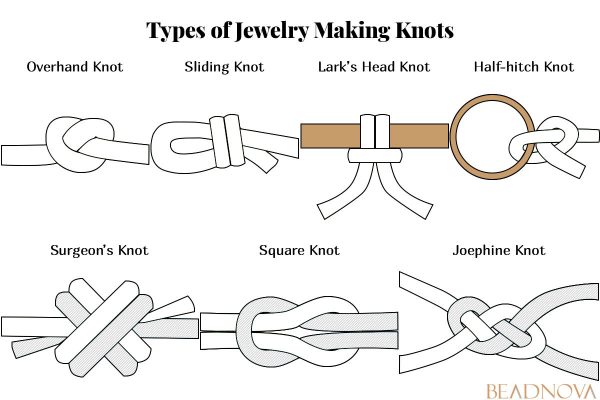
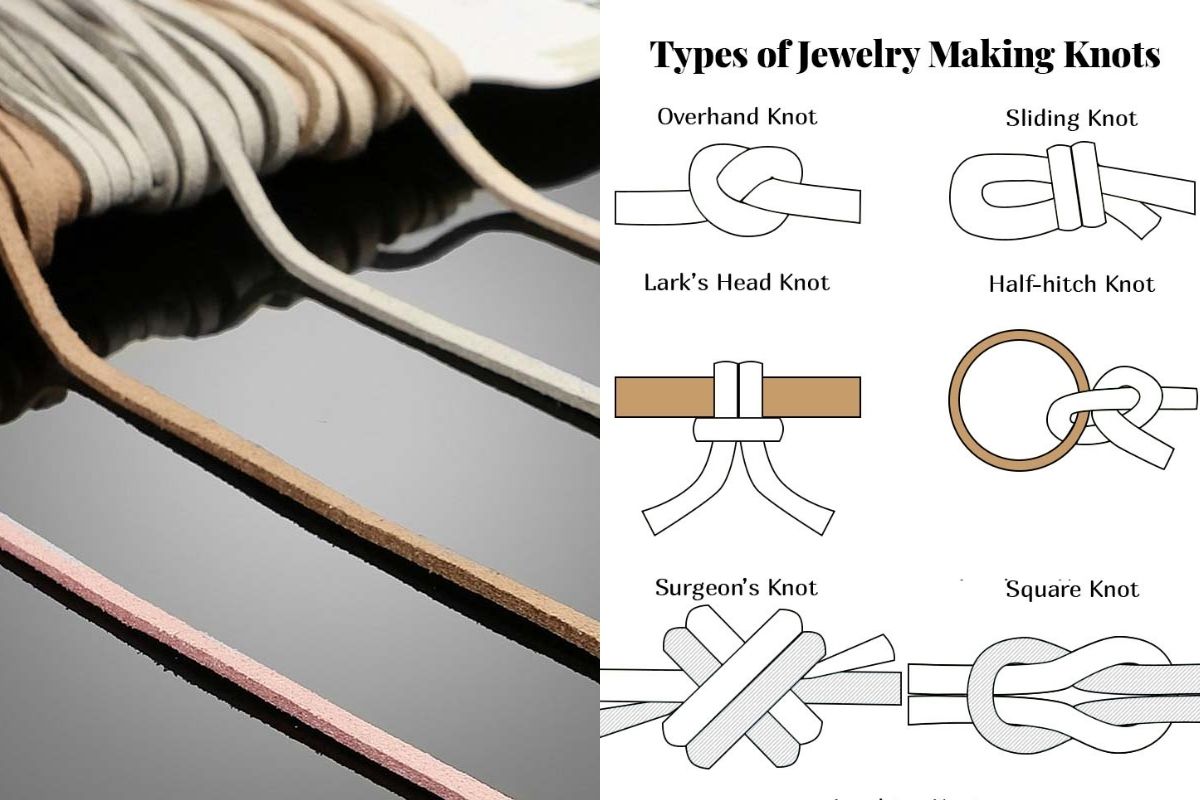
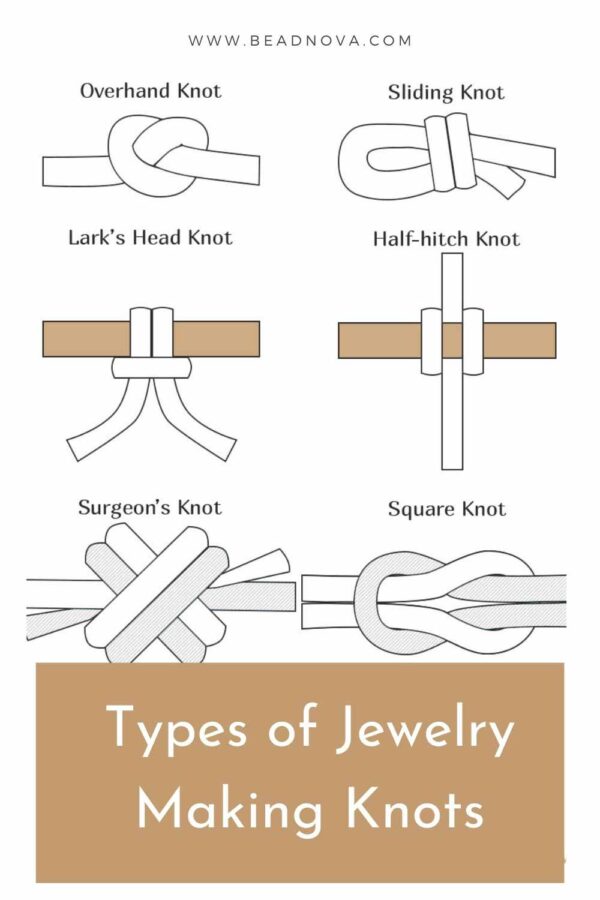
1.Overhand knotting
The overhand knot is the most familiar type of knot because it’s simple: you just put one end over the other, creating a single loop, and that’s it. However, this knot is also the weakest and should only be used for separating beads and for non-tension areas of bracelets and necklaces.
Pearl knotted jewelry often uses the overhand knot as well as simple patterns that require spacing between the ornamental pieces. Overhand knotting is often used to secure ornamental pieces to prevent damage to the main thread or to ensure that the intended symmetry of the pieces is maintained after the whole piece is tied up at the ends.
How to make an overhand knot?
View following demonstration:
2.Sliding knotting
Sliding knotting is more popular with necklace makers because it can be used for all kinds of projects and leather cords.
Round leather cords are most suitable for this type of knotting, as it is easier to fit the round cord through the knot and this allows for the resizing of the jewelry. Use sliding knots if you like to change how your necklace appears, or if you just want to be able to loosen it sometimes when you feel stuffy.
Also, changing the length of the necklace can produce a completely different visual effect on the item itself. For example, if you pull an adjustable necklace all the way back, the necklace becomes a nice choker.
If you loosen it until you hit the locks on the cord, then it became a matinee-length necklace. Amazing, isn’t it?
As a quick reminder, be sure to get in all your additional ornamentation and knots before you tie this knot because once it’s in, your necklace or bracelet is considered done.
A quick tip when using this knot – make sure that you have sufficient excess string on either side, so you can knot properly. Otherwise, you may be able to knot, but the necklace might end up being tighter than usual. An easy way to make sure that you have just the right quantity of cord is by trying on the necklace or bracelet just before closing the final knot.
How to make a sliding knot?
View following demonstration:
3.Lark’s head knotting
All you need to do is pull the two ends and the loops are closed. Additional loops may be used on other parts of the string once the pendant has been secured by the main lark’s head knot. (Take note that this is great for bracelets and necklaces that require only one main pendant. Otherwise, we suggest using another kind of knot if you are using different pendants of varying sizes throughout the necklace or bracelet.)
How to make a lark’s head knot?
View following demonstration:
4.Surgeon’s knotting
The surgeon’s knotting is a modified overhand knot with two loops. To perform this knot, make one overhand knot but wrap each end around the resulting loop two times on each side.
Once the wrapping is done, make another overhand knot and pull until both loops coalesce with each other and you have one neat but somewhat bulky looking overhand knot. This type of knot is recommended mainly for necklaces that require an elastic cord or string, as overhand knots tend to slip with such materials.
You can also use this knot if your necklace keeps unraveling because the cord you are using is too slippery. It is absolutely fine to use another kind of knot regardless of what instructions on the pattern are telling you.
If the knot that is recommended isn’t working, then you need to adapt and modify to ensure that the necklace or bracelet actually works as designed. There’s a bit of mechanics involved when making DIY jewelry and you must do what works best.
How to make a surgeon’s knot?
View following demonstration:
5.Square knotting
Square knotting is most useful for leather cord bracelets that have a hard leather core, or thick leather cords that have been folded to provide bulk to the bracelet or necklace.
Wrap-around bracelets and necklaces also benefit from square knotting as this type of knowledge is actually decorative and produces symmetrical lines throughout the jewelry that are quite pleasant to look at, especially if you are using two different colors. We highly recommend that you only use cords of the same material and make sure that the tightness of each square knot is proper and consistent throughout the necklace or bracelet. If you want to braid leather cords, this would be the perfect knot to try first.
How to make a square knot?
View following demonstration:
6.Josephine knotting
The Josephine knotting resembles three overhand knots combined into one knot. The loops are created side by side like petals on a flower, and this knot is considered as a decorative knot.
If you have lots of patience, you can use this knot to add texture to your necklaces or bracelets or to create the perfect type of spacer between beads. Definitely an awesome choice for longer necklaces.
How to make a josephine knot?
View following demonstration:
7.Half-hitch knotting
Half-hitch knotting is recommended for jewelry pieces that have plenty of beadwork as this knot is meant to hold items in place. It’s really simple to make a half- hitch: simply loop one end over the other string and over the bead, create a half loop and insert the end into the main loop and pull.
This technique allows the cord or string to wrap around the bead before closing two associated loops with just one pull. You can create a series of half-hitch knots for every large bead you have on your necklace or bracelet.
How to make a half-hitch knot?
View following demonstration:
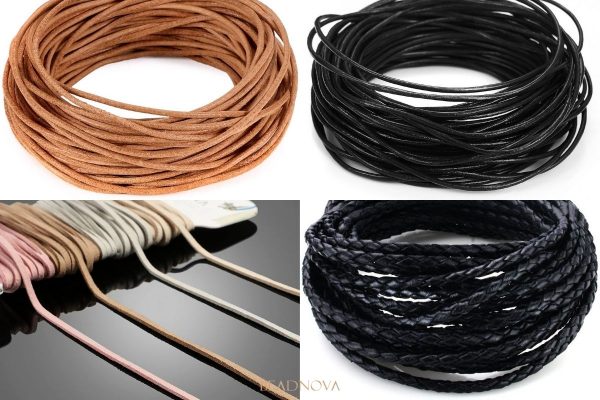
Types of leather cords: Round style, flat style, braided style
Check out our different types of leather cords for your jewelry making project: round leather cords, flat leather cords, braided leather cords
More articles about DIY leather jewelry you may interest:
How To Straighten Leather Cord for DIY Jewelry?
Which Style, Round or Flat Leather Cord, are better for DIY crafts?
How To Make Leather Cord Bracelets?
How to Prevent Leather Cord from Getting Harder and Rotten?
2 Easy Ways on How to Soften Hardened Leather


Leave A Comment