
If you have always wanted to know how to rhinestone shoes and how to apply Swarovski crystals![]() on your shoes for that added glamour, you have come to the right place. Today we are going to teach you exactly how this can be done with tools you can easily purchase online or from neighborhood craft stores.
on your shoes for that added glamour, you have come to the right place. Today we are going to teach you exactly how this can be done with tools you can easily purchase online or from neighborhood craft stores.
Table of Contents
Tools Requirements
If you have been tinkering with jewelry and other accessories before, you’re probably curious if it is a wise move to tinker with Swarovski crystals, as they tend to be more expensive than costume jewelry.
We think that with the right tools, anyone can produce a pair of beautiful (and valuable) Swarovski crystals footwear. The most common project of this type involves applying Swarovski crystals to high heeled shoes. For this project, you will need the following materials:
- A pair of high heel shoes – Since Swarovski crystals are generally more premium than other kinds of accessories, go for mid-range to top-notch shoes. There is no point in accessorizing an old pair that is just falling apart from the seams. If you are going to accessorize with something with glamour and brilliance, go for a pair of shoes that are not so old.
- Cuticle stick
 – This is a stick used to scrape the surface of nails and push back the cuticle.
 - Bluetack
- Syringe for crafts projects – This basic syringe is used as an applicator so you can get the right amount of adhesive out while you are working on your DIY project. Search around online or it, and you will have an easier time with projects similar to this one.
- E6000 Glue – this adhesive is the industrial-strength version of white glue and it is used mainly for crafts projects. E6000 is like the Terminator of the crafting world because it easily resists moisture, heat, and generally moving about.
- Tweezer – This is used to pick up and position individual Swarovski crystals on the surface of the shoes.
- Swarovski crystals – For this DIY project, you will need flatback swarovski crystals. You will need multiple sizes ranging from the smallest (2.6 mm) to the largest ones (6.5 mm).
View this post on Instagram
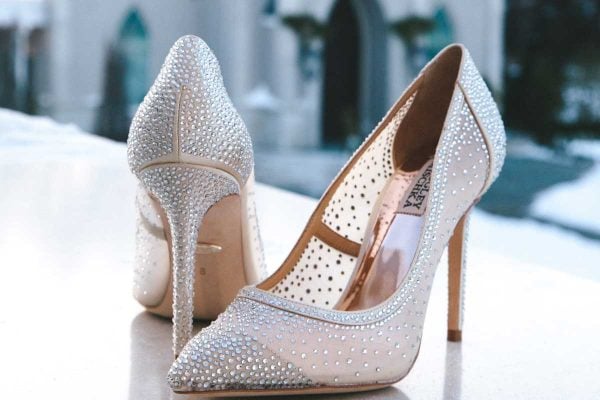
DIY Rhinestone Shoes with Swarovski Crystals
The first step is to fill your craft syringe with a small quantity of E6000 adhesive. It’s not a good idea to fill your craft syringe all the way through. Go for half or less, you can always refill the syringe later when you need some more. Stick the needle to your Bluetack at hand to prevent the E6000 from curing and drying. This is probably the most challenging part of working with an industrial-strength adhesive like the E6000. Heavy-duty glues tend to cure quickly, so you have to move quickly as well, without making any mistakes.
Gather all your Swarovski flat-back crystals and place them faceted side up on a tray. Organize them by size so you won’t get confused later on how you are going to organize everything.
Assuming that you have already cleaned and dried the surface of the shoes that you are going to be using, go ahead and pick up your first rhinestone with the wax tip of your jewel setter. The neat thing about jewel setters is that there is barely a curve in learning how to use them, and as long as you grab the rhinestones by the flat side, you are going to be able to apply glue properly.
RELATED POST: How to Apply Swarovski Crystals on Nails?
Can you apply glue first on the shoe instead of the rhinestones?
Simply put, no, you can’t. If you apply the glue first, you will likely make a lot of mistakes along the way, and the rhinestones just might fall off or slip out in your rush to install them before the glue dries. So follow the more conventional method – glue on the rhinestone first and then you can stick the rhinestones on the shoes.
Now, you will notice that the jewelry setter will often leave small quantities of wax on top of the rhinestones. It’s just wax, and there is no rush to remove it. Feel free to wipe away the wax after the E6000 has fully cured, as you run the risk of accidentally removing or repositioning some of the rhinestones if you try to remove the wax too quickly.
What’s the cuticle stick for, anyway?

![]() Whether you have a metal one or a wooden one, all you need is the tip. When you press down each rhinestone onto the shoe, you will use the cuticle stick to affix the rhinestone as you pull away from the wax-tipped jewelry setter.
Whether you have a metal one or a wooden one, all you need is the tip. When you press down each rhinestone onto the shoe, you will use the cuticle stick to affix the rhinestone as you pull away from the wax-tipped jewelry setter.
Otherwise, the positions of the rhinestones might become skewed, and that is never a good outcome when you are trying to glamorize a pair of shoes. Use the tip of your cuticle stick to add sufficient pressure to the rhinestones so that the E6000 will form sufficient adhesion to the shoe. Without the additional pressure, the E6000 may just stick to the crystal surface and not to the shoe.
After pressing down for a few seconds on the rhinestones you will notice that there can be quite a bit of excess glue around each of the Swarovski crystals.
Don’t free – just use the tip of the cuticle stick once again to remove the excess glue and just wipe it off with a damp piece of cloth. A damp piece of cloth can also be used as a substitute if you can’t find a Bluetack for your craft syringe. It may not work as well, but it’s more suitable than not having anything to stop the E6000 from drying and setting at the tip of the craft syringe.
Continue adding different rhinestones to your shoes until you get a good combination of small, medium and large rhinestones. Since this style of shoes takes inspiration from the roaring fifties and beyond, it might be a good idea to research how they designed rhinestone shoes back in the day too.


